What is Cloudflare Tunnel? Exposing Internal Services to the Outside World Without Port Forwarding
Today, many organizations and general users have internal services they want to make accessible from the outside, such as Synology NAS, Web Servers, n8n, Home Assistant, Grafana, Uptime Kuma, APIs, or various backend systems.
The method many people are familiar with is doing Port Forwarding on a Router or Firewall to expose the service's port to the internet. For example, opening port 5000 or 5001 for Synology DSM and connecting via a Public IP or DDNS.
While this method works, it exposes internal services directly to incoming connections from the internet, which increases the risk of port scanning, brute-force attacks, or exploitation of vulnerabilities in the exposed services.
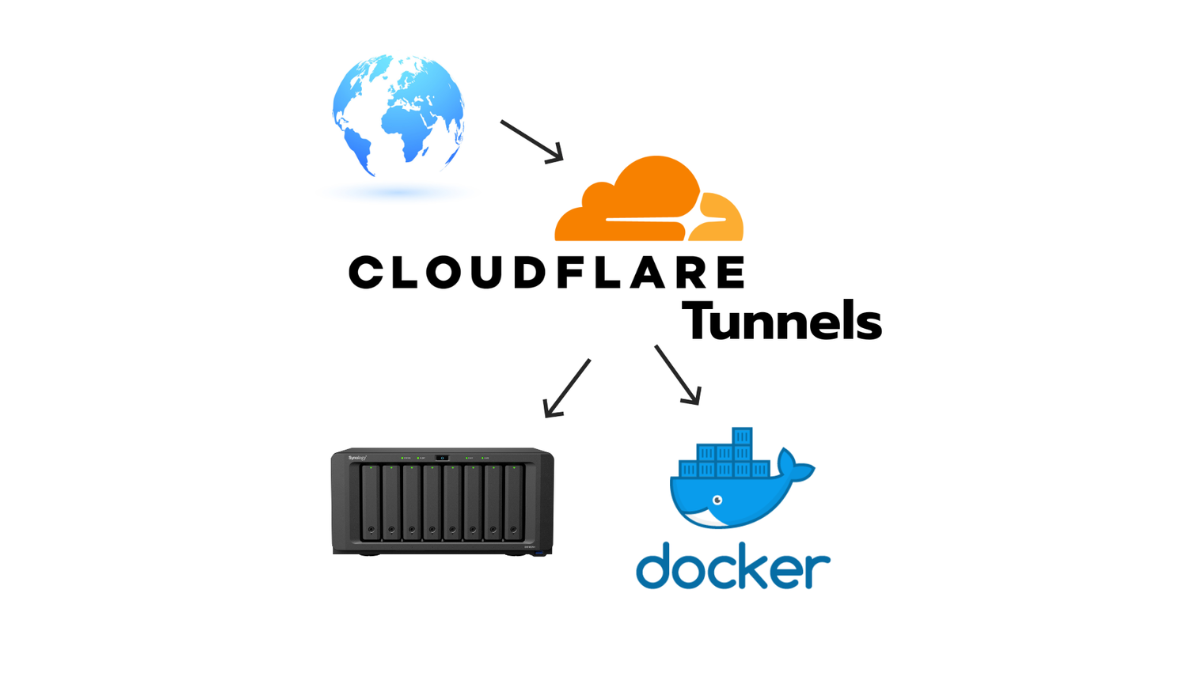
Cloudflare Tunnel is an alternative that allows you to publish internal services to the internet without needing to open inbound ports on your Router or Firewall.
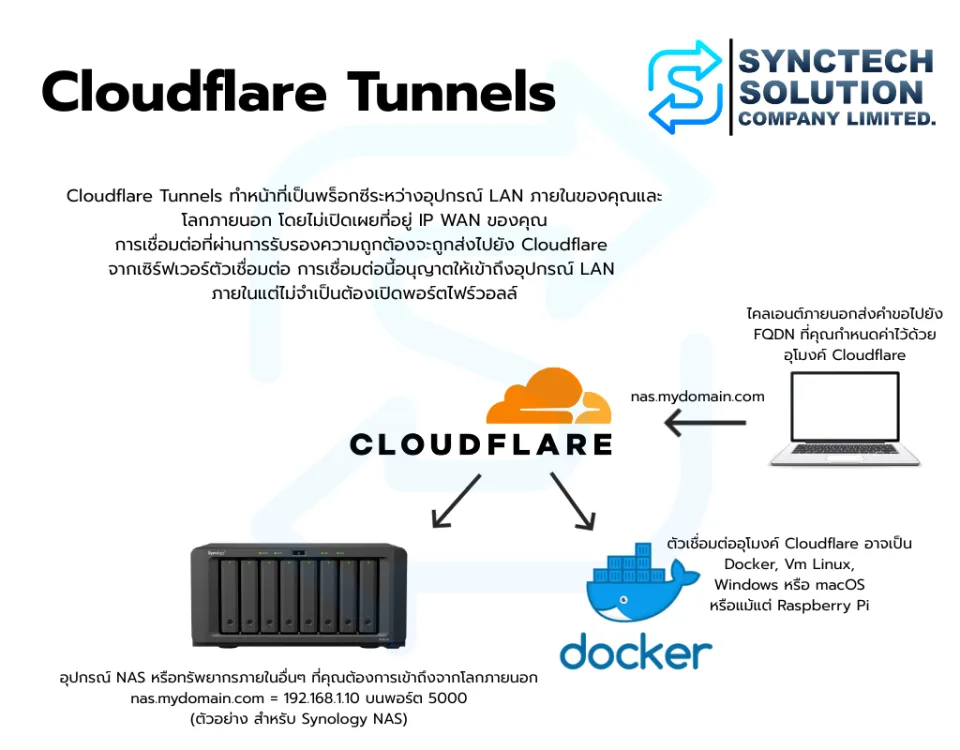
The working principle is that a program called cloudflared, installed within your network, creates an outbound connection to Cloudflare. Cloudflare then receives requests from external users and forwards them to your internal services via the established tunnel.
For example, if you have a Synology NAS in your office and want to access the DSM interface remotely, you previously might have had to open port 5000 or 5001 on the router. With Cloudflare Tunnel, users can access it via a domain name like nas.example.com without opening any NAS ports to the internet.
Cloudflare Tunnel is ideal for home users (Homelabs), small businesses, retail shops, offices, and enterprises looking to securely increase remote access to internal services.
How Does Cloudflare Tunnel Work?
Cloudflare Tunnel uses a program called cloudflared to act as a connector between your internal network and Cloudflare. This program can be installed on Linux, Windows, Synology NAS, or any device that supports Docker and Containers.
When cloudflared starts, it establishes an Outbound HTTPS connection from inside your network to Cloudflare, meaning you do not need to open any inbound ports from the internet into your Router.
When a user opens a URL such as:
https://nas.example.com
Cloudflare receives the request from the user, routes it through the Tunnel to cloudflared, and then cloudflared forwards it to the target service inside your LAN, like a Synology NAS, Web Server, or n8n, before returning the result to the user.
Synology NAS / n8n / Web Server / API
The advantage of this approach is that external users connect via Cloudflare instead of connecting directly to the organization's Public IP, eliminating the need to set up Port Forwarding for those services.
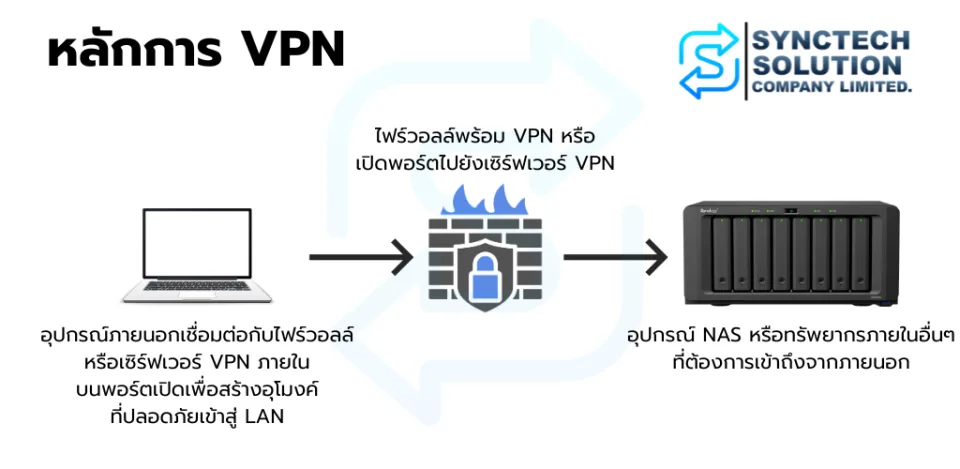
How is Cloudflare Tunnel Different from VPN and Port Forwarding?
Although all three methods provide remote access to internal systems, their underlying concepts differ significantly.
| Feature | Port Forwarding | VPN | Cloudflare Tunnel |
|---|---|---|---|
| Requires opening ports on Router | ✔ | Mostly required | ✘ |
| Requires a Public IP | ✔ | Mostly required | ✘ |
| Works behind CGNAT | ✘ | Depends on the system | ✔ |
| Access via Domain Name | ✔ | Sometimes | ✔ |
| Best For | Exposing specific individual services | Accessing the entire network | Web Applications and internal services |
Use Cases for Cloudflare Tunnel
- Exposing Synology DSM via nas.example.com
- Exposing n8n via n8n.example.com
- Publishing internal Web Applications
- Accessing Dashboards like Grafana or Uptime Kuma
- Exposing REST APIs for external systems to call
- Operating networks situated behind CGNAT
Benefits of Cloudflare Tunnel
- No Port Forwarding Required: Reduces the risk of exposing internal services directly to the internet.
- Supports CGNAT: Can be used even without a dedicated Public IP.
- Domain Name Access: Easier to remember than IP addresses and port numbers.
- Multi-Service Support: Create separate subdomains for distinct systems.
- Integrates with Cloudflare Access: Adds an identity verification layer before accessing the system.
While Cloudflare Tunnel minimizes the risks of Port Forwarding, it does not automatically make your system secure. For critical services like Synology DSM, ERPs, Routers, or internal Dashboards, it should always be paired with Cloudflare Access and Multi-Factor Authentication (MFA) for an extra layer of security.
What to Prepare Before Using Cloudflare Tunnel
Before creating a Cloudflare Tunnel, you should have the basic components ready to ensure proper connection and reduce installation issues.
1. Domain Name
Cloudflare Tunnel requires a domain name whose DNS can be managed via Cloudflare. You can use a new or existing domain, such as:
- example.com
- example.co.uk
- mydomain.net
After adding the domain to Cloudflare, you can create subdomains for each service, for instance:
- nas.example.com for Synology DSM
- n8n.example.com for n8n
- web.example.com for Web Server
- monitor.example.com for Grafana or Uptime Kuma
- api.example.com for REST APIs
In this article, we will use the example domain synctechtestcloudflare.online, which you can replace with your own domain.
2. Cloudflare Account
You need a Cloudflare account to manage your DNS and Cloudflare Tunnel. If you don't have one, you can sign up for free and add your domain to the Cloudflare Dashboard.
For general use cases like exposing Synology DSM or Web Applications, you can start with the Free Plan.
3. Cloudflare Zero Trust
Cloudflare Tunnel is managed through Cloudflare Zero Trust, which is used to create tunnels, check connector statuses, and define which services to route through domain names.
In this guide, we will use Cloudflare Zero Trust to:
- Create a Tunnel
- Connect the cloudflared Connector
- Add a Public Hostname
- Implement Cloudflare Access at the end of the guide
4. A Machine to Install cloudflared
The cloudflared program acts as the connector between Cloudflare and your internal network. Therefore, it should be installed on a device that is always on, such as:
- Synology NAS
- Linux Server
- Windows Server
- Mini PC
- Virtual Machine
- Docker Container
In this guide, we will use Synology NAS + Container Manager because it is easy to install, consumes minimal resources, and is suited for 24/7 operation.
Adding a Domain to Cloudflare
If your domain is not yet using Cloudflare DNS, the first step is to add it to your Cloudflare account.
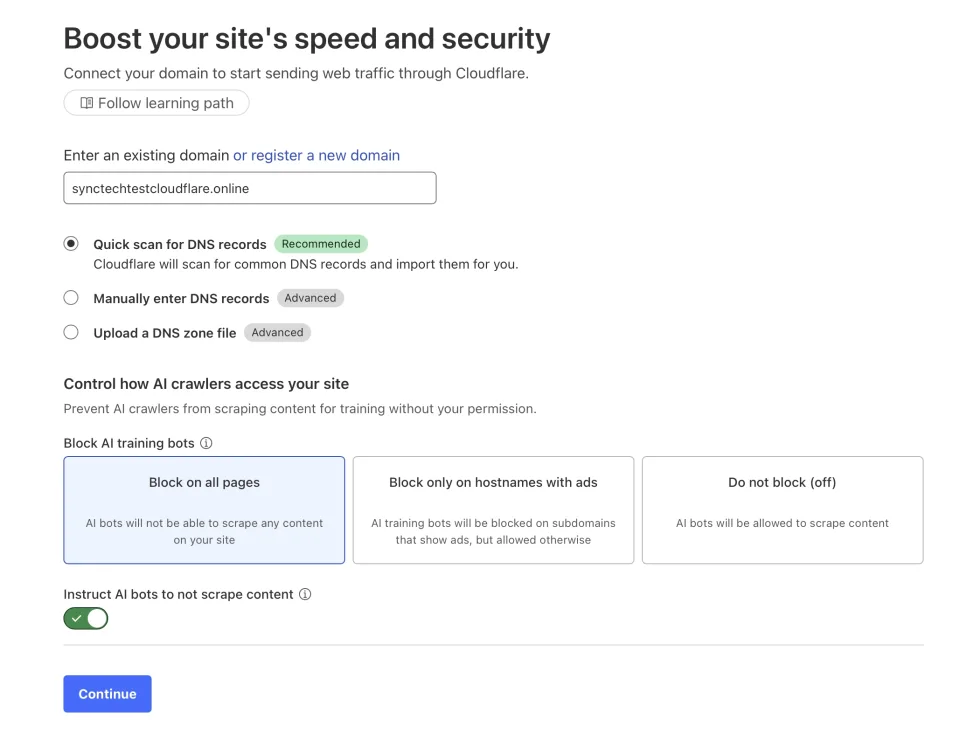
Step 1: Add a Domain
- Log into the Cloudflare Dashboard
- Go to Account Home
- Click Add a domain
- Enter the domain name you wish to use
Step 2: Select a Plan
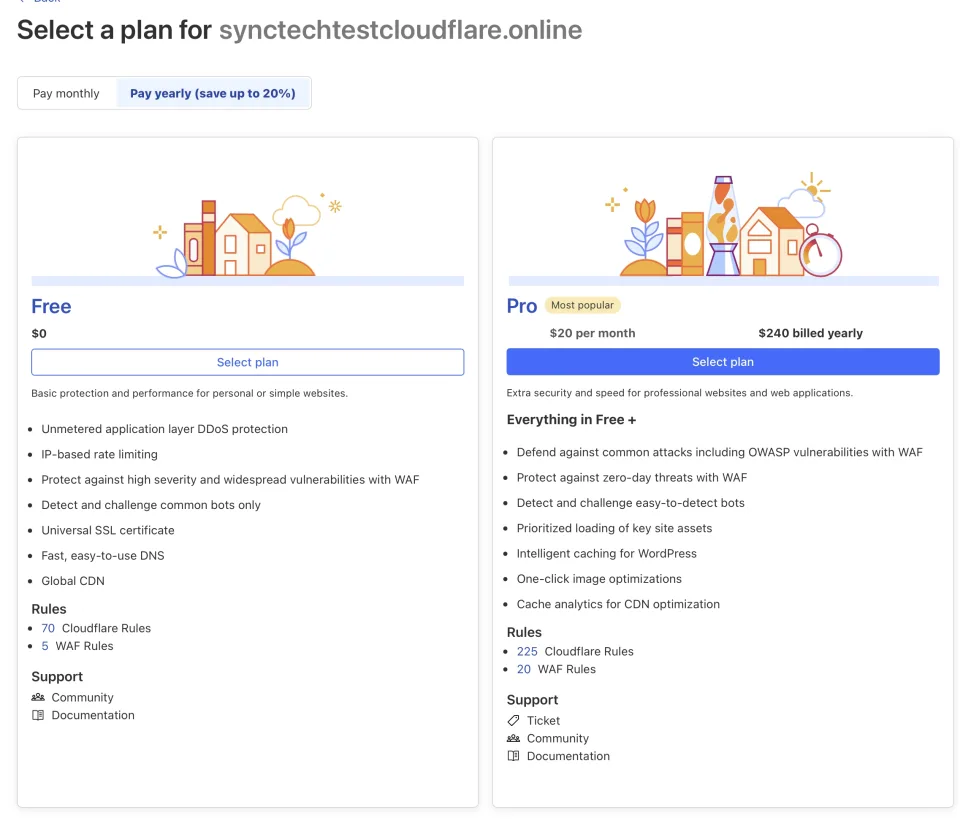
Cloudflare will prompt you to select a plan. For general or trial usage of Cloudflare Tunnel, you can select the
Free Plan
Then click Continue to proceed.
Step 3: Review DNS Records
Cloudflare will scan for existing DNS Records and display them for review.
If the domain has an active website or email system, ensure all crucial DNS records have been imported correctly.
If it's a brand new domain specifically for Cloudflare Tunnel, you can review the list and click Continue immediately.
Step 4: Change Nameservers
Cloudflare will provide 2 new Nameservers. Replace your domain's old nameservers at your Domain Registrar with these new ones.
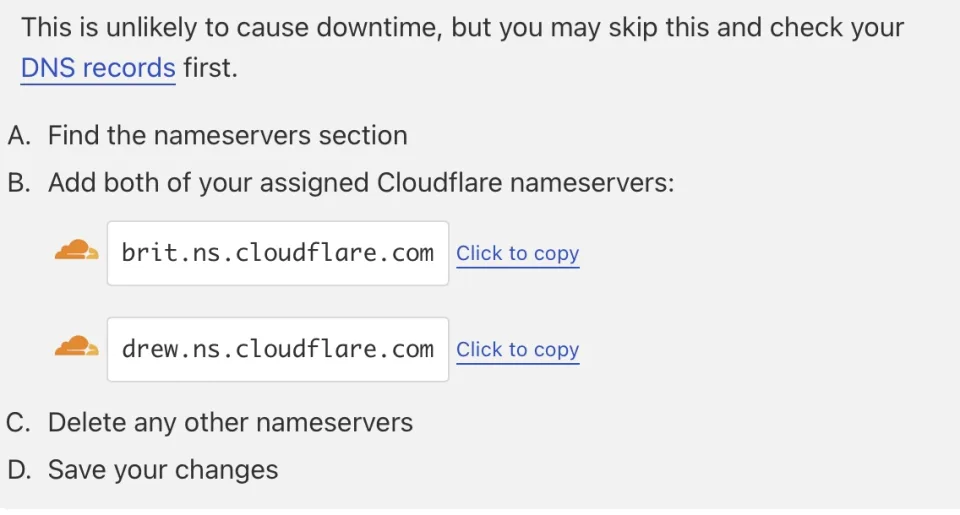
Log into your domain provider's management panel and update the nameservers to the ones provided by Cloudflare.
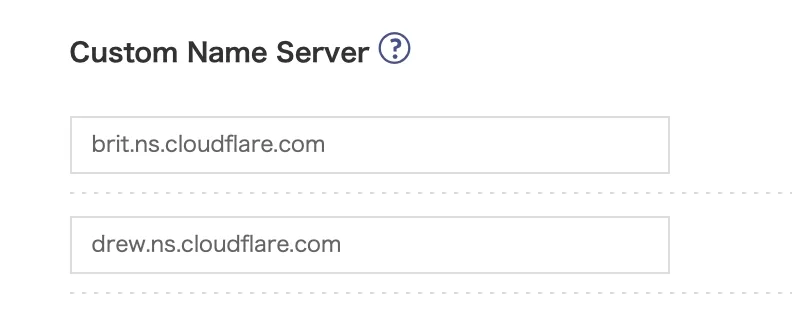
If the domain currently hosts an active website or email service, verify that all DNS Records are fully imported before changing nameservers to prevent downtime.
Step 5: Wait for Verification
After updating the Nameservers, return to Cloudflare and click
Check nameservers now
so Cloudflare can verify the status.

Nameserver updates can take anywhere from a few minutes to several hours, depending on the domain registrar.

Once the domain is successfully verified, Cloudflare will show the status as
Active

With the domain active, you are ready to create a Cloudflare Tunnel in the next step.
Creating a Cloudflare Tunnel
Once your domain is Active, the next step is to create the Cloudflare Tunnel, which acts as the bridge between Cloudflare and your internal network.
Cloudflare Tunnel consists of 2 main parts:
- Creating the Tunnel on Cloudflare.
- Installing the cloudflared program inside your network to connect to the created Tunnel.
Once both components are working together, you can expose internal services like Synology NAS, Web Servers, or n8n via a domain name.
Step 1: Enter Cloudflare Zero Trust
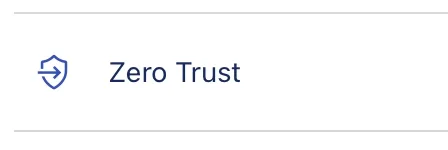
From the Cloudflare Dashboard, select Zero Trust to enter the Cloudflare Zero Trust management interface.
Step 2: Open the Cloudflare Tunnel Menu
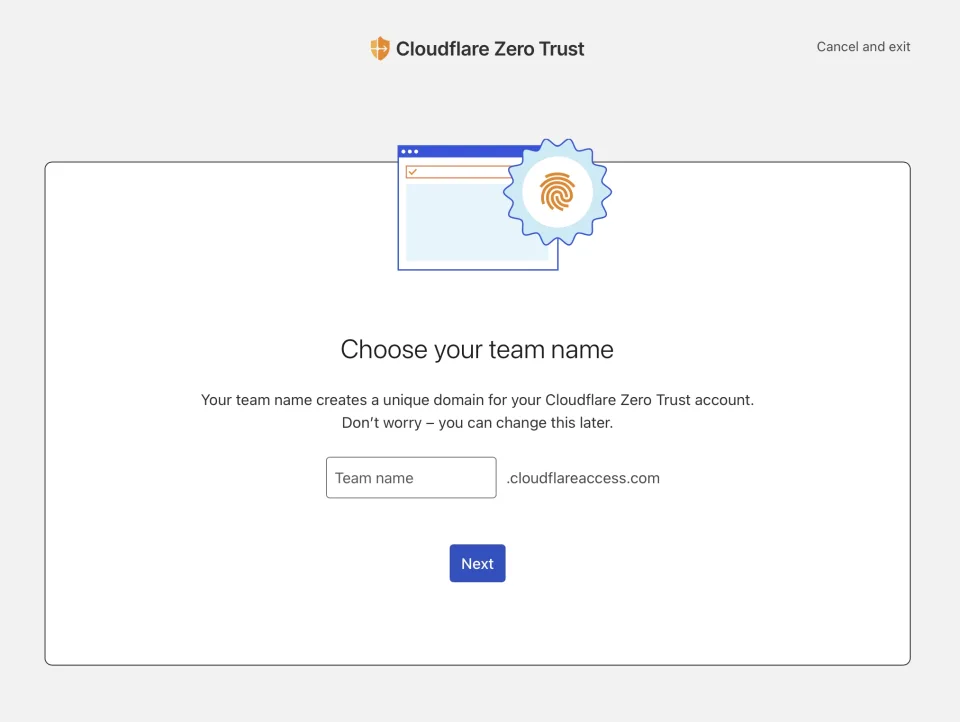
Inside Cloudflare Zero Trust, navigate to the Networks > Tunnels menu to manage tunnels, as shown in the image.
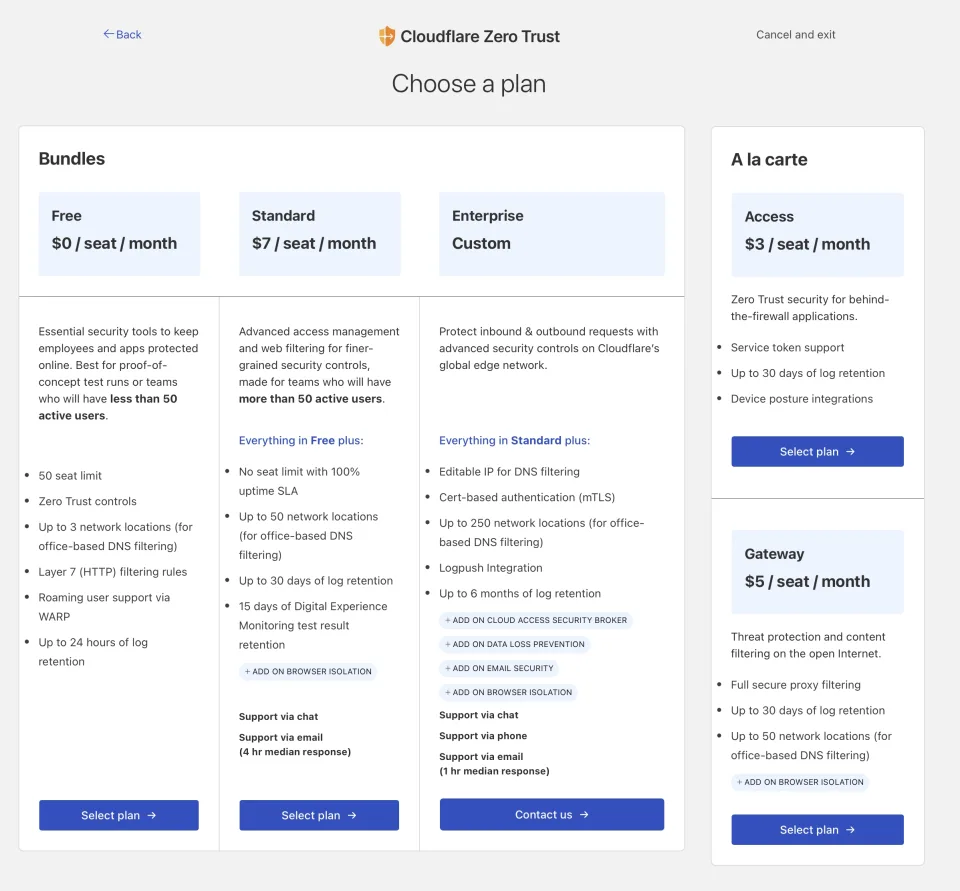
Then click the Create tunnel button to create a new Tunnel.
Step 3: Select Connector Type
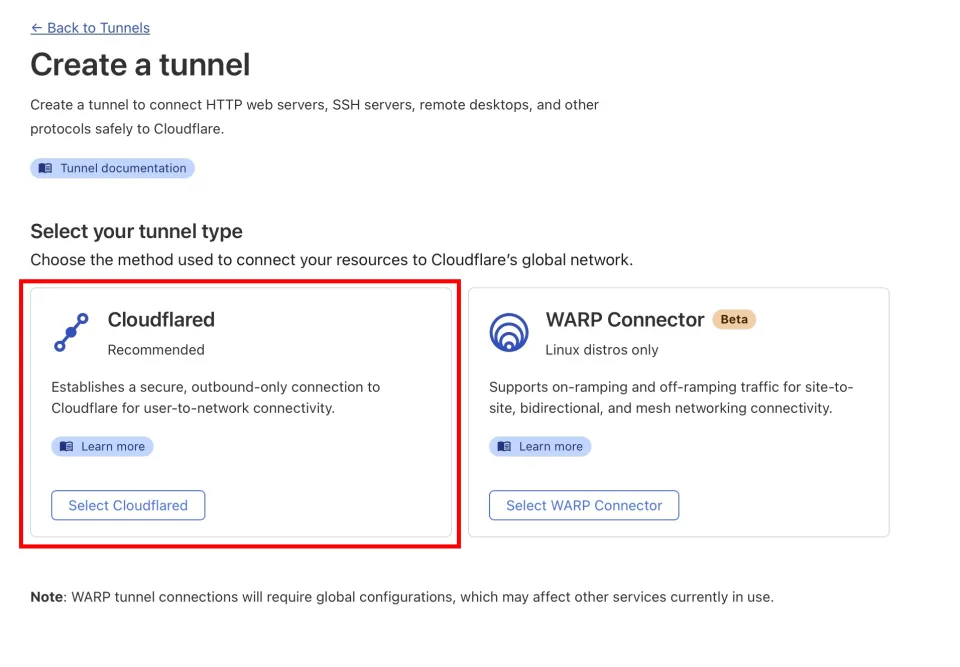
Cloudflare will ask you to choose a connector type. For this guide, select
Cloudflared
because we will install the cloudflared program on a Synology NAS using Container Manager.
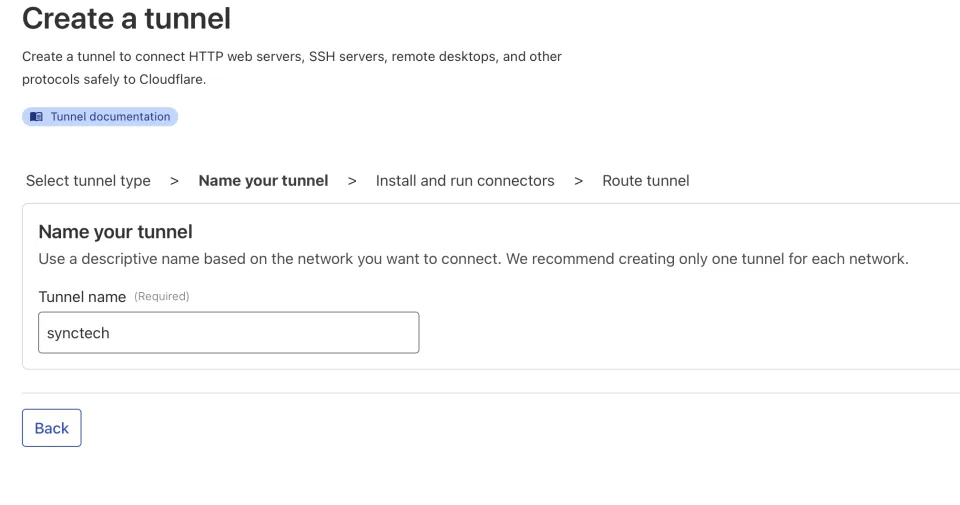
Step 4: Name the Tunnel
Assign a meaningful name to the Tunnel, for example:
- synctech
- main-office
- office-nas
- head-office
- branch-01
This article uses the name:
synctech
Then click Save tunnel.
If you have multiple branches or multiple Synology NAS units, it is recommended to name the Tunnels based on location, such as:
- head-office
- bangkok-office
- factory-rayong
- branch-01
This will make management much easier when handling multiple Tunnels.
Step 5: Copy the Tunnel Token
After successfully creating the Tunnel, Cloudflare will display installation commands for the Connector. Within these commands, you will find a Tunnel Token used to connect to your specific Tunnel.
When using Synology Container Manager, we only need the command portion:
tunnel --no-autoupdate run --token YOUR_TUNNEL_TOKEN
Replace YOUR_TUNNEL_TOKEN with the actual Token provided by Cloudflare.
Example:
tunnel --no-autoupdate run --token eyJhIjoiNTU2MDgwOGM3ZDk1NGNl...
In this article, the Tunnel Token is partially redacted for security. Always use your own account's actual Token for your setup.
The Tunnel Token is highly sensitive information. It should never be published on websites, in images, videos, or public Git Repositories. If you suspect your Token has been exposed, create a new one immediately.
Installing cloudflared on Synology NAS
Once you have the Tunnel Token, the next step is to install cloudflared on your Synology NAS via Container Manager to connect the Tunnel to your internal network.
This article uses Container Manager because it is easy to configure, resource-efficient, and ideal for continuous 24/7 operation.
Step 1: Download the Image
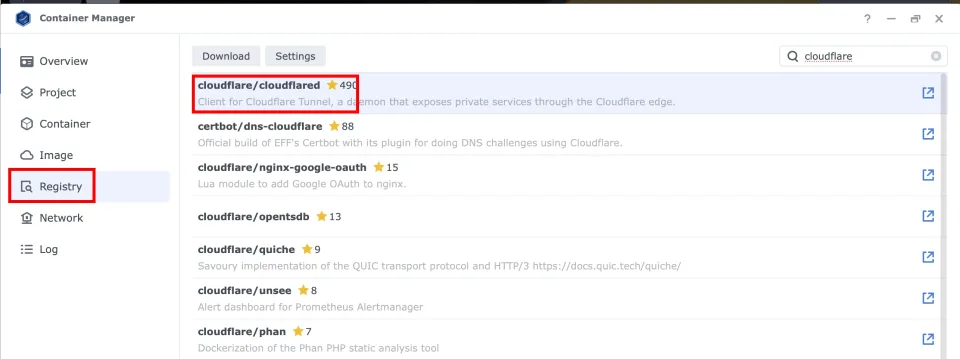
Log into your Synology DSM and open Container Manager.
Go to the Registry menu and search for:
cloudflare/cloudflared
Select the image published by Cloudflare and click Download.
For the tag, you can choose:
latest
to use the newest version.
Step 2: Create a Container
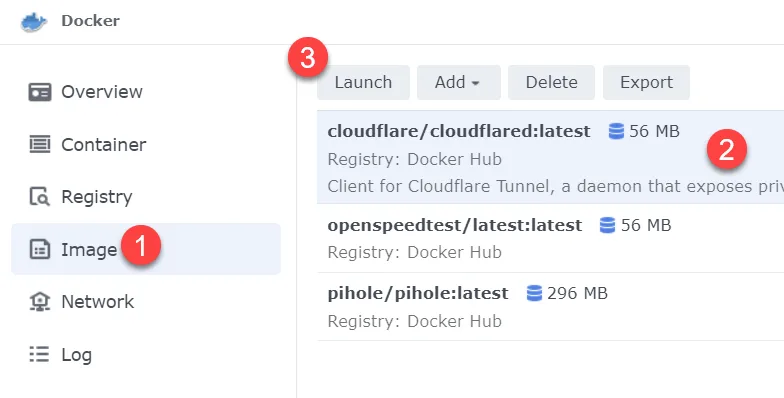
Once the download is complete, go to the Images menu, select cloudflare/cloudflared, and click Run.
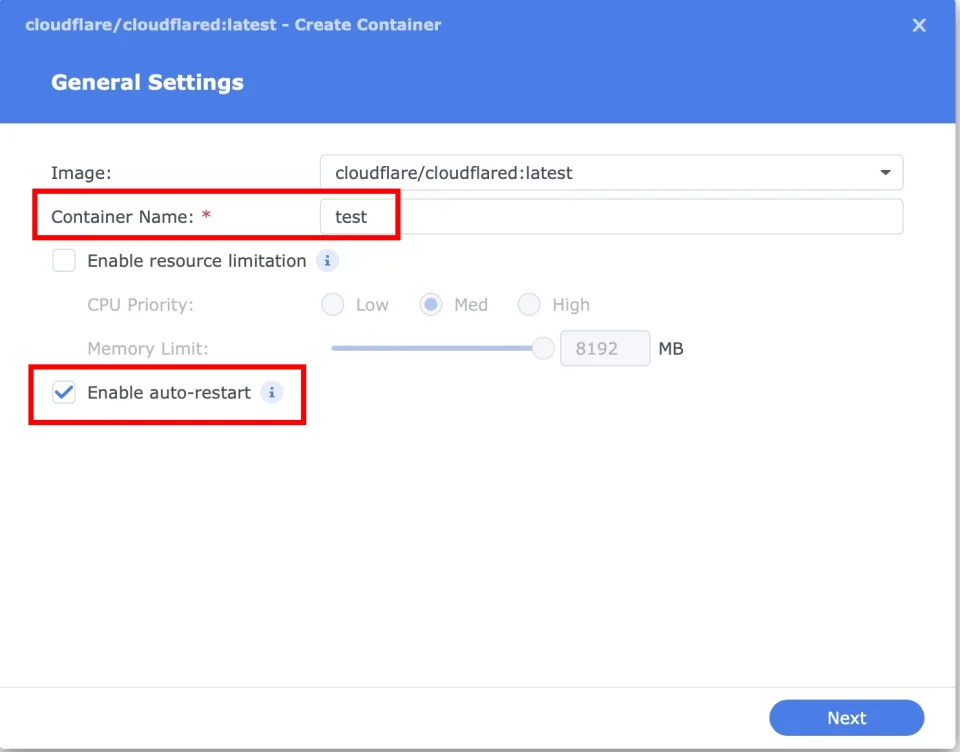
Name the Container, for example:
- cloudflared
- cf-tunnel
- synctech-tunnel
Then enable:
Enable auto-restart
so the Container automatically restarts if the Synology NAS reboots.
Step 3: Define Execution Command
In the Execution Command field, enter the following command:
tunnel --no-autoupdate run --token YOUR_TUNNEL_TOKEN
Example:
tunnel --no-autoupdate run --token eyJhIjoiNTU2MDgwOGM3ZDk1NGNl...
(It is recommended to add --no-autoupdate to prevent unexpected container crashes in the long run. If you need to update the version, it is better to download a new image (Pull latest) rather than letting the program self-update inside the container.)
Then click Next and Done.

Verify Connector Status
After the Container starts, return to the Cloudflare Tunnel page. If the connection is successful, you will see the statuses:
- Healthy
- Connected
This indicates that the Synology NAS has successfully connected to Cloudflare and is ready for adding internal services.

- Check if the Tunnel Token is correct.
- Ensure the Synology NAS has internet access.
- Check if the Container is in a Running state.
- Review the Container Logs.
- Verify you have selected the correct Tunnel.
Once the status is Healthy, you are ready to configure internal services for access via Cloudflare Tunnel in the next step.
Adding Internal Services to Access via Cloudflare Tunnel
Now that the Tunnel and Connector are running, the next step is deciding which services in your network can be accessed from the internet.
Cloudflare links a domain name (Subdomain) you define to a specific internal service via the Tunnel. This allows users to access the service via a domain name without needing to connect directly to the organization's Public IP.
In this example, we will expose the Synology DSM interface via Cloudflare Tunnel.
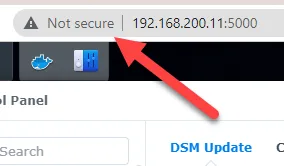
Assume the Synology NAS is accessible locally at:
http://192.168.200.11:5000
And you want users to access it externally via:
https://nas.synctechtestcloudflare.online
Once configured, users can instantly use that domain name without any Port Forwarding configured on the router.
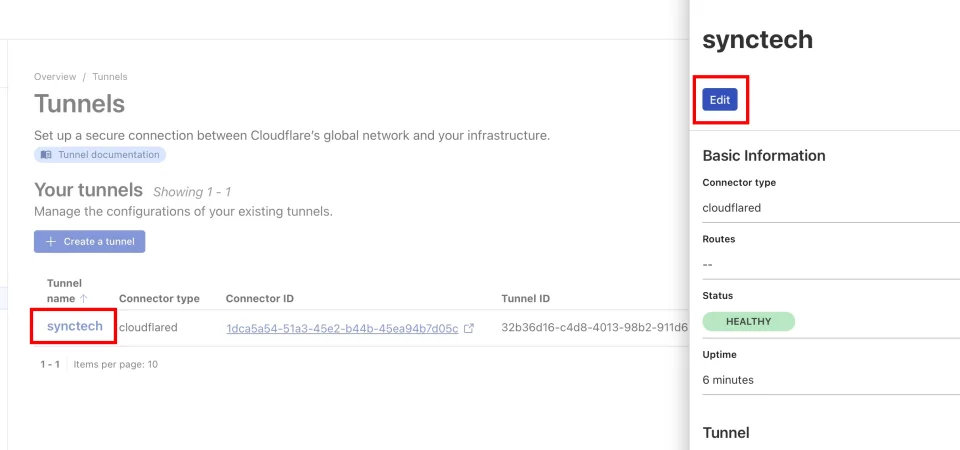
Step 1: Open Public Hostname Settings
Return to the Cloudflare Tunnel page, select the created Tunnel, and click Configure.
Select the Public Hostnames tab and click Add a public hostname.
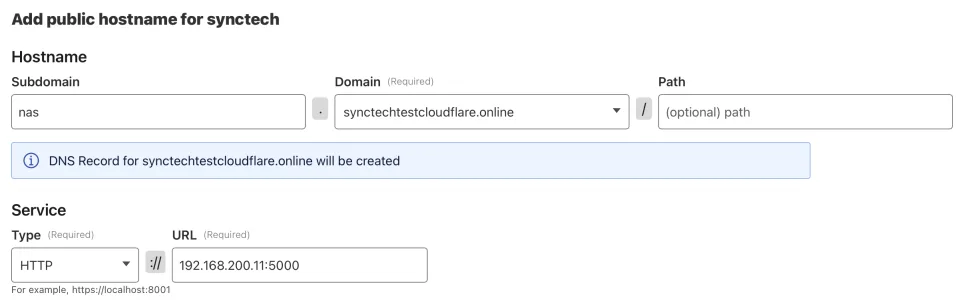
Step 2: Configure Public Hostname
Fill out the information as follows:
| Item | Example | Description |
|---|---|---|
| Subdomain | nas | The subdomain for the service |
| Domain | synctechtestcloudflare.online | Select the domain added to Cloudflare |
| Service Type | HTTP | Select the protocol of the internal service |
| URL | 192.168.200.11:5000 | The IP Address and Port of the internal service |
For this example, the internal Synology DSM operates over:
http://192.168.200.11:5000
So we select:
Service Type = HTTP
If your service operates over HTTPS, such as:
https://192.168.200.11:5001
You can choose Service Type = HTTPS. (Note: For most Synology NAS setups, the default certificate is Self-signed. Cloudflare will block this and display a 502 Bad Gateway error. To fix this, you must go to Additional application settings > TLS and enable No TLS Verify before using the service.)
If you are unsure whether the internal service uses HTTP or HTTPS, try opening it from a local machine on the LAN first, e.g.:
http://192.168.200.11:5000
or
https://192.168.200.11:5001
Then select the Service Type that matches how the service actually operates.
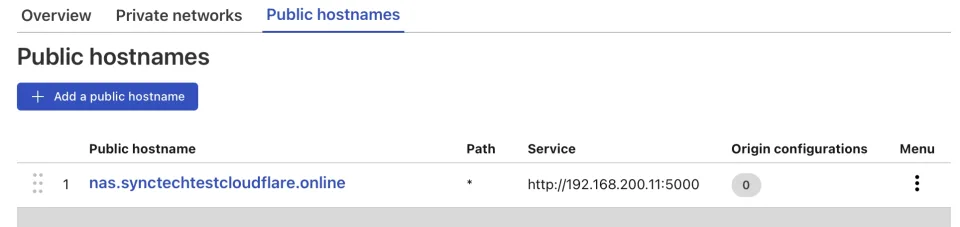
Step 3: Test the Connection
Once you save the settings, Cloudflare will automatically generate the corresponding DNS Records.
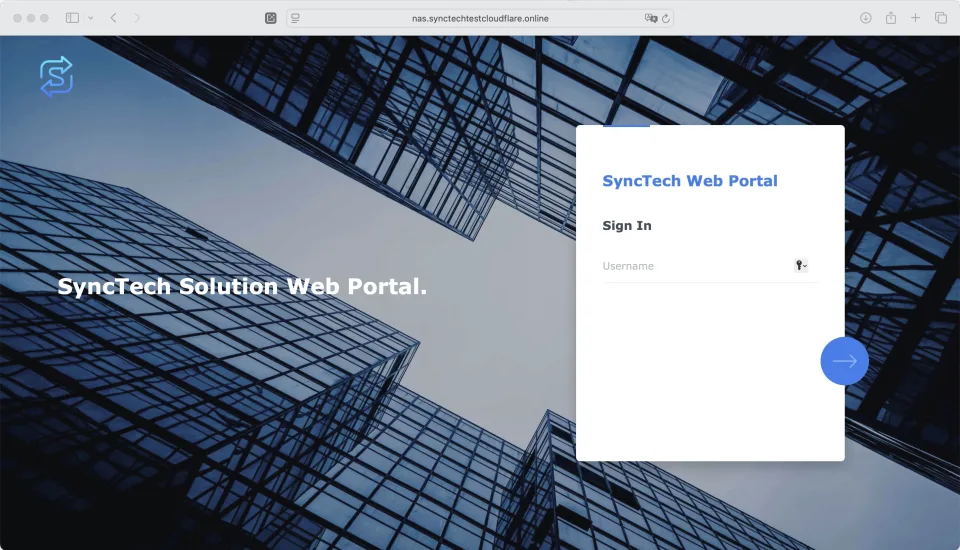
Try opening the URL in a web browser, for example:
https://nas.synctechtestcloudflare.online
If everything is correct, the Synology DSM login screen will appear via Cloudflare Tunnel.
Examples of Configuring Public Hostnames for Other Services
Cloudflare Tunnel allows you to create multiple Public Hostnames within a single Tunnel, making it possible to expose various services using the same primary domain.
| Service | Internal URL | Subdomain |
|---|---|---|
| Synology DSM | http://192.168.200.11:5000 | nas.example.com |
| n8n | http://192.168.200.11:5678 | n8n.example.com |
| Web Server | http://192.168.200.20 | web.example.com |
| Grafana | http://192.168.200.30:3000 | grafana.example.com |
| Uptime Kuma | http://192.168.200.30:3001 | status.example.com |
| REST API | http://192.168.200.40:8080 | api.example.com |
Separating subdomains by service type makes administration easier and allows you to independently configure access permissions for each system via Cloudflare Access later.
Cloudflare Tunnel merely establishes a connection pathway. For critical systems like Synology DSM, Routers, Firewalls, ERPs, or internal Dashboards, it should always be used alongside Cloudflare Access to mandate user authentication before allowing system access.
Implementing Cloudflare Access for Enhanced Security
Cloudflare Tunnel allows internal access without Port Forwarding, but it doesn't mean internal systems are automatically secure.
Cloudflare Tunnel only builds the connection path between Cloudflare and the internal service. It does not authenticate or verify the user. Therefore, if you expose critical services like Synology DSM, n8n, Routers, Firewalls, or corporate Dashboards, they must be used in conjunction with Cloudflare Access.
Cloudflare Access is a service within the Cloudflare Zero Trust suite that helps define who can reach internal systems. Users must verify their identity before they can connect to designated services.
What Can Cloudflare Access Do?
- Require users to log in before system access
- Support Google Workspace
- Support Microsoft Entra ID
- Support GitHub and other Identity Providers
- Enforce Multi-Factor Authentication (MFA)
- Restrict access based on Email
- Restrict access based on Country
- Restrict access based on Public IP
- Configure Session Durations
Usage Example
Suppose you expose Synology DSM at:
https://nas.example.com
Instead of showing the Synology login page immediately, Cloudflare Access will verify the user's identity first.
For instance, you can allow only users with a company email:
@sync.co.th
Once authenticated, Cloudflare then forwards the request to the Synology DSM inside your network.
For critical systems like Synology DSM, ERPs, NAS devices, or internal Dashboards, you should always enforce Multi-Factor Authentication (MFA) alongside Cloudflare Access.
Best Practices
Even though Cloudflare Tunnel drastically reduces Port Forwarding risks, a securely designed system should utilize multiple layers of defense.
- Enable Cloudflare Access for all critical services.
- Enforce Multi-Factor Authentication (MFA).
- Apply Least Privilege access permissions.
- Set appropriate Session Timeouts.
- Use strong, hard-to-guess passwords.
- Regularly update Synology DSM and cloudflared.
- Periodically review Tunnel and internal service logs.
- Regularly back up system data.
- Store Tunnel Tokens securely.
- Expose only the services strictly necessary for actual use.
What to Avoid
- Expose Synology DSM to the public without Cloudflare Access.
- Publish Tunnel Tokens on websites, images, or public documents.
- Expose Routers or Firewalls through the Tunnel without authentication.
- Use weak passwords or bypass MFA.
- Expose unnecessary services to the internet.
- Neglect updating Synology DSM or cloudflared for extended periods.
What to Check if You Cannot Connect?
If the Tunnel status is Healthy but you still cannot open the service via the domain name, check the following in order:
- Is the cloudflared Container still in a Running state?
- Is the Tunnel Token correct?
- Is the Public Hostname configured properly?
- Does the Service Type match the target service (HTTP vs. HTTPS)?
- Are the IP Address and Port of the internal service correct?
- Can you access the service from a local machine inside the LAN normally?
- Have the domain's DNS records fully propagated?
- Check the Container Logs for detailed error messages.
If Synology DSM is operating locally at:
http://192.168.200.11:5000
but you configure the Public Hostname as:
Service Type = HTTPS
The connection may fail because the protocol does not match the target service. Always verify the internal service protocol before configuring.
Summary
Cloudflare Tunnel is a robust alternative that safely exposes internal services like Synology NAS, Web Servers, n8n, Dashboards, and APIs to the internet without needing to configure Port Forwarding or expose the organization's Public IP.
For Synology NAS users, installing cloudflared via Container Manager is simple, requires few resources, and is well-suited for continuous operation. Once connected, you can immediately add Public Hostnames to access internal services via domain names.
However, for critical services, you should not rely on Cloudflare Tunnel alone. It should be combined with Cloudflare Access, Multi-Factor Authentication (MFA), strict user permissions, and regular log reviews to maximize system security.
When properly implemented, Cloudflare Tunnel minimizes the complexity of exposing internal services, facilitates remote access conveniently, and significantly enhances system security for home users, small businesses, and enterprises alike.
Need expert advice or would like to request a quotation? Contact us today:
E-mail: [email protected]
LINE Official: @sync.co.th

The Company reserves the right to correct any typographical or printing errors and shall not be held liable for any inaccuracies resulting from such errors.
*** This article is the intellectual property of SyncTech Solution Company Limited. Reproduction, modification, or redistribution of this content, in whole or in part, is strictly prohibited without prior written permission from the Company. ***